Sunday, June 29, 2014

Summer All Day Crop and Save the Dates!

Our Christmas in July Sale is this coming week, Wednesday July 2nd until Saturday July 5th! ALL Christmas/ Winter paper and embellishments, stamps, stickers all 40% off!
Shop early for great selections! See you then!

We just wanted to let you know that we are having a Summer All Day Crop Saturday August 9th 10:00am - 11:00pm
The cost is $40.00 for the day and includes lunch, d...inner and tons of snacks!
Registration is required, so call the store 519-895-0554 to reserve your spot now!

SAVE the DATE
We just wanted to let you know that we will be having our annual Garage Sale September 27th this year. More details to follow in August's newsletter.

Also, check out our calendar for all classes and crops we will be having over the summer!

Friday, June 27, 2014

A Sketch With A Twist

Hello everyone!!!!  Today I decided to do something different as far as my sketches go.  I will give you another sketch that I did recently.  But with a twist.  I took the layout and did a bit of mixed media with it.  Below is the sketch - with measurements - then a picture of the layout before I did my mixed media technique.

  There are no embellishments on this layout but it will still give you an idea of paper placements according to the sketch.


So I decided to take the layout and whitewashed the papers using a watered gesso.  This will blend the papers together. Let everything dry completely.

Next, using a Tim Holtz burlap stencil and some moulding paste, I applied the paste as shown below.  This gave it some more texture.
  
Let this dry.  I did have to go back and adhere some of the edges of the papers.  When all was glued down properly,  then I sprayed with mists - turquoise blue first then came back with a brown.  When the mists were completely dry, I added a lightly stamped image here and there using black ink.  Below is the completed mixed media technique.  When you add your pictures and embellishments the layout takes on a new look.


And here is the completed layout with pictures and embellishments.  As this is a boy layout, I kept the embellishments simple and leaning toward the male influence.  For more texture I added some burlap pieces behind the pictures.


Try this technique - you will be surprised at how easy it is.
Until next time
HAPPY SCRAPPING!!!!!
and remember
"An angler is a man who spends rainy days 
sitting around on the muddy banks of rivers doing nothing 
because his wife won't let him do it at home."

New Stuff!!!!

Just a little update of all the new products we received this week...


Authentique - "Adventure" paper and such


Ranger - Dina Wakley paints, and Tim Holtz's little distress ink pads!


Stampin' Bella - stamps


Kraftin' Kimmie - Stamps... and they are adorable!!!


Tiddly Inks - stamps


Echo Park - to arrive today or early next week!


All these new products will be online this weekend!

Friday, June 20, 2014

Mixed Media Canvas

Last week a few of us got together at the store to do some playing and working on some of our art journaling and mixed media.  I, of course, did the mixed media which I love.  I like to just sit down, get out a lot of "stuff" from my stash and begin planning out what I want to do.  So I gathered up some "stuff" from home, put it all in a bag and off I went to my playing session.  Below is what I gathered up.  For this project colour does not matter.  Just use up odd flowers you have lying around as well as chipboard pieces, leaves, metal pieces.   I will list all the items I used at the end.


I decided to use a 9" x 12" canvas.  I first painted the whole surface with a coat of gesso.  Then I started applying the other materials - cheese cloth, doilies, dry wall tape and crepe paper.  Place mod podge onto the canvas first  then adhere the product you are using .  Apply  the mod podge on top of the product.   First the doilie close to the top of the canvas, crepe paper wherever I felt, drywall tape here and there then the cheesecloth in the middle near the top.  I kept these products on the upper two-thirds of the canvas.  Because of the fence at the bottom, I felt the products would have been covered.  You can have the materials touching each other, anywhere will do.   When that was done I applied moulding paste with a brick stencil (to the left of the window) and then using my spatula I applied it below the window and above the fence.  Let all of this dry completely.  Using a heat gun helps especially with the moulding paste which will take the longest to dry.
I then began to place my "stuff" onto the canvas - do not glue just yet.  Make sure that you have everything where you want it.  I basically started from the top edge and went around the edges first.  I had some strips of chipboard left over from a set of chipboard shapes.  I cut them to size and used them as a frame around the outside of the canvas.  Then I die cut some vines out of chipboard and added them onto the frame first.  Then I placed my flowers onto the vines.  I began placing the rest of my "stuff", first the chipboard fence across the bottom, then the flowers and leaves on the fence.  I  got going so well on my placement of pieces that I did not take a picture of where I placed everything.   But you will be able to see in the pictures below.  I also used some metal buttons, a metal key at the bottom left side and a wood die cut butterfly on the window.   When you are happy, using a glue gun (for the best possible adhesion) adhere all your pieces down.
 Now for the next step.
Using white gesso paint the entire surface of the canvas - all flowers, chipboard, everything. This is why you do not have to worry about colours of your items.  Depending on how dark some of your items are you can apply a second coat.   Below is a picture of the canvas painted white.  I had already started the next step but you can see the white effect and the placement of items.


I decided instead of using sprays in different colours, which I have done on all my other mixed media products, I decided to do something a little different.  Using Tim Holtz distress stains, and some distress paints I hand-painted all the flowers and leaves using a paint brush.  It really wasn't all that bad, in fact, I quite enjoyed it and it really did not take all that long.  Below is a picture of the paint technique.  The pink, blue and green were the distress stains; the darker yellow was my own mixture of yellow kraft paint and gesso; the lighter creamier flowers was done using distress paint; and the green on the background around the window and brick wall was using distress stain.
 Below is a closeup of the bottom left corner.

When everything was dry and I was happy with the colours, I took a very light brown spray and sprayed here and there onto the canvas.  I removed some of the spray from the window and corners above it as I wanted it to remain as white as possible.  If the spray was too heavy in some spots, while it was still wet, I took a piece of paper towel and dabbed it off.  I only wanted a very light brown accent.  I also went back and added some more of the blue and pink distress stains to the flowers and the green on the leaves to pull out the colour a little more.   I added some diamond glaze to some of the darker pink flowers.  Below is the final result.

And a couple of close-ups.


Here is a list of the products I used:
Tim Holtz Distress Stains:  Tumbled Glass (flowers)
 Bundled Sage (leaves and background) 
Victoria Velvet (flowers)
A light pink spray from my stash - my own mixture (dipped my brush into it)
Tim Holtz Distress Paint:  Picket Fence(window and corners) Antique Linen (flowers and moulding paste above fence)

For the brown spray I watered down a brown spray (Lindy's Moon Shadow Mist) with water.

Other products:  White gesso; matte mod podge
Doilies, cheese cloth, crepe paper, dry wall tape for background
And I added in some white pearls here and there at the very end.  Applied dimensional pearls to the decorative chipboard shape at the top and the butterfly.

Let me know what you think.  
Until next time
HAPPY SCRAPPING!!!!
and remember
"The world of reality has its limits, but the world of imagination is boundless"

Scrapbook & Cards Today Summer Issue now in stock

Stop by soon to get your copy of this summer's issue of Scrapbook & Cards Today! 
(Free with any purchase in store or online)


Friday, June 13, 2014

Sunshine Inspired Layout

Hello everyone!!!  Today I thought I would share a layout with you that I have been wanting to do for a long time now.  My inspiration came from a piece of paper that had sunshine rays on it.  So I thought I would try it.  I first selected a background paper then 4 patterned papers with different designs on them but making sure that the colours fit well with each other.  

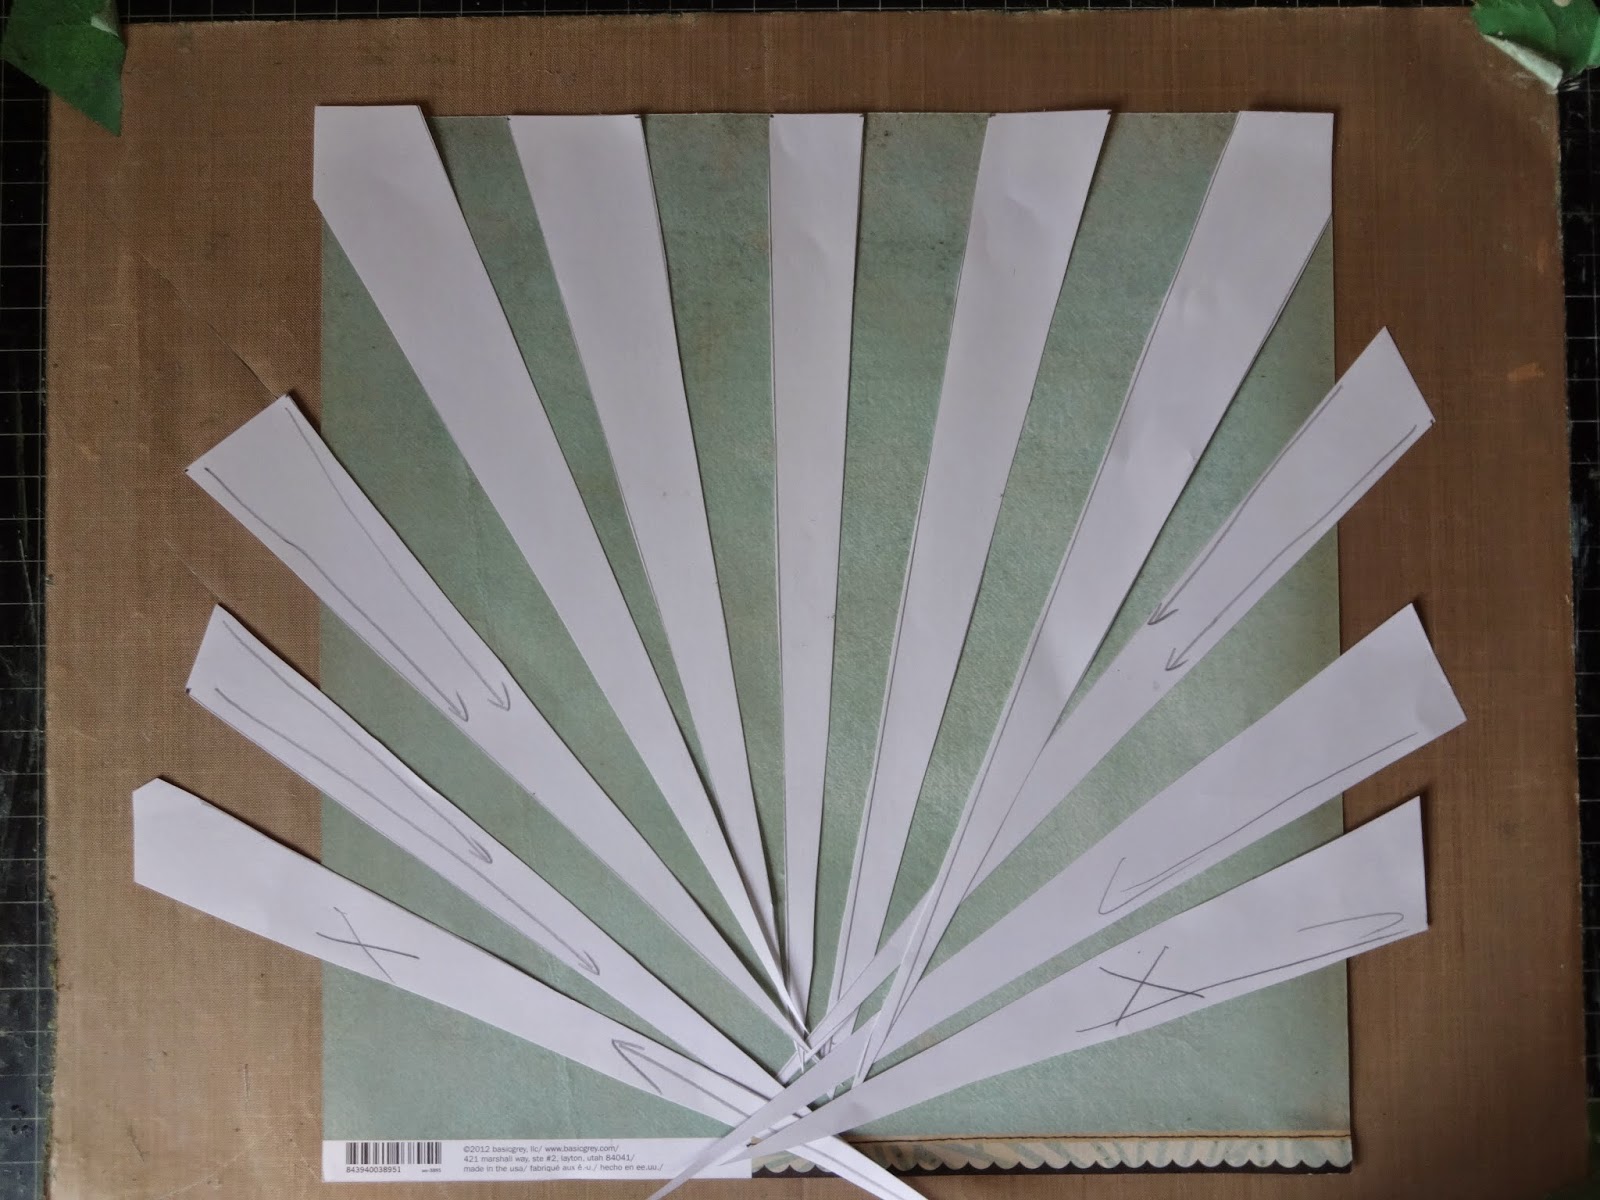
To start with I took a piece of 12 x 12 white paper (the piece that is inserted into your refills will do).  I began drawing the rays onto the paper starting with the upper left corner of the paper, bringing it down to the middle of the bottom edge.  Next to this, leaving a space in between, I drew the next one.  I drew them randomly until I got the one in the middle done.  Then I drew the ones on the other side of the paper the same size as the first ones.  See below.
You will cut out the strips with scissors or your cutter if you want.  These will be a template which you will trace onto the back side of your papers you have selected.
For the strips that go along the sides and down to the bottom I simply used the same strips that I cut for the top half.  They will extend over the edges but this will not affect the layout.  When you cut the actual strips for the layout, the ones on the side will be trimmed off.  Lay your strips down onto your background paper as shown below.  Do not adhere these down.

Now you will want to take the strip in the centre trace it out onto your patterned paper (on the back) then cut it out.  Place this one in the spot where the tracer piece was.  Do not glue the strips down yet. I then did my corner ones, then the others.  Lay them all down to make sure you have them even and the patterns where you want.  I also decided to add a thinner strip between the corner pieces and the striped ones.  This is optional.

When you are happy you can begin adhering them down.  Don't worry about the mixed up points at the bottom.  As you can see from the layout I covered this spot with more papers and my pictures.   I also added a strip at the bottom left and right corners.   When they are all adhered take your scissors and trim off the ones that are off the edges of the background paper.  Oh yes, make sure that you trim off the advertisement strip at the bottom of your paper.  I actually took the picture before I did this.  And here is the finished layout.

For the bottom section I selected a patterned paper that was not in the sun rays.  It was 6" wide x 5" long.  I adhered it even with the bottom edge and centering it.  I then punched a couple of scalloped circles from the sun rays papers as well as a couple of 3/4" wide strips.  I adhered my pictures onto chipboard and used pop dots to raise them up.  Added some vines, flowers and brads.  Very simple.  I also placed white and yellow dimensional pearls dots between the sun ray strips to add a little sparkle.
I do hope you try this.  It is quite easy to do.
Until next time
HAPPY SCRAPPING!!!!
and remember
"There are only two lasting bequests we can leave our children:  one is roots; the other, wings."  H.Carter

Tuesday, June 03, 2014

Mixed Media Album Cover continued.....

Hello everyone!!!!   Donna is here again with a continuation of my mixed media album cover tutorial that I posted on May 3rd.
I finally completed the back cover.  I used the same chipboard as I used on the front cover.  For the binding at the centre I cut a piece of chipboard the same length as the covers x 2" wide.  I then put the two together  with the 2" binding piece on the left side of the back cover and making sure they were very close together I adhered a piece of  wide duck tape from top to bottom.  I then flipped the piece over so that the binding piece was on the right side.  This is now the front side of the pieces.  I adhered the front cover to the centre binding after I completed the remaining back and binding pieces.
Basically what I did was I did the same procedure on the back cover with the kraft paints in the same colours.  I applied the green first, then the yellow, then the blue and lastly a bit of pink to give it pop.   I only painted the blue onto the binding piece.  When completely dry I used my mists in the same 3 colours - turquoise, vibrant green and pink.  For the binding I sprayed with the turquoise spray and with a paper towel I lightly dabbed some of the spray off to give a more mottled look.  I did the same with the green spray.
Here is the result.

Next I applied my moulding paste with the burlap stencil as I did on the front cover.  I let this dry and gave it a light spray with the turquoise mist.  For the binding I covered the entire surface using the moulding paste and the burlap stencil.
Next I applied the glass beads using  the rays stencil as on the front cover.  I matched the stencil to the stencilled area on the front cover on the inside edge.  I laid the stencil down onto the binding and the back cover piece.  I then applied the beads to the binding first then over onto the back cover.  You can see with the picture below while the glass beads are still wet where I placed the glass beads.

I let this dry completely, and again the beads dried clear with the colours underneath coming through.
I then added my butterflies as I did on the front cover and stamped around the outer edges with the border stamp and the vine stamp.

When everything was completely dry I turned the piece over to the wrong side and turned the front cover over to the wrong side.  Place the front cover on the left side of the centre binding and keeping them very close adhere another strip of the duck tape to hold them together.  I will be covering the duck tape when I complete the inside of the covers.
I plan on making a trip album using this cover so I have lots more to share with you as I complete the inside pages.  Below is the cover when they are all attached to each other. 
 I was quite pleased with how it turned out.

I hope you enjoyed the completion of my cover.  And I will keep you posted  as to how the inside pages are coming along.   I'll be doing a bit more mixed media on them.  Oh yes, mix some beige paint with the glass beads and guess what you have - "sand".  I will be using this on one of the inside pages later on.

"Quote of the Day"
"No one realizes how beautiful it is to travel until he comes home 
and rests his head on his old familiar pillow."  Lin Yutang
Until next time
HAPPY SCRAPPING!!!!!

Monday, June 02, 2014

New Products for Summer!!

Even though summer is in full swing, we're loving all the new products that continue to come in our door...check out that latest and greatest that have arrived lately.  They're all online as well :)
 
Authentique: Accomplished (Perfect for graduation!)
 
 
Simple Stories: Good Day Sunshine


Authentique: Favourite