Tuesday, December 15, 2015

8 x 8 Album Kit

Good morning everyone.
Today I am going to show you an 8" x 8"   8 page album that I have created and is available as a kit.
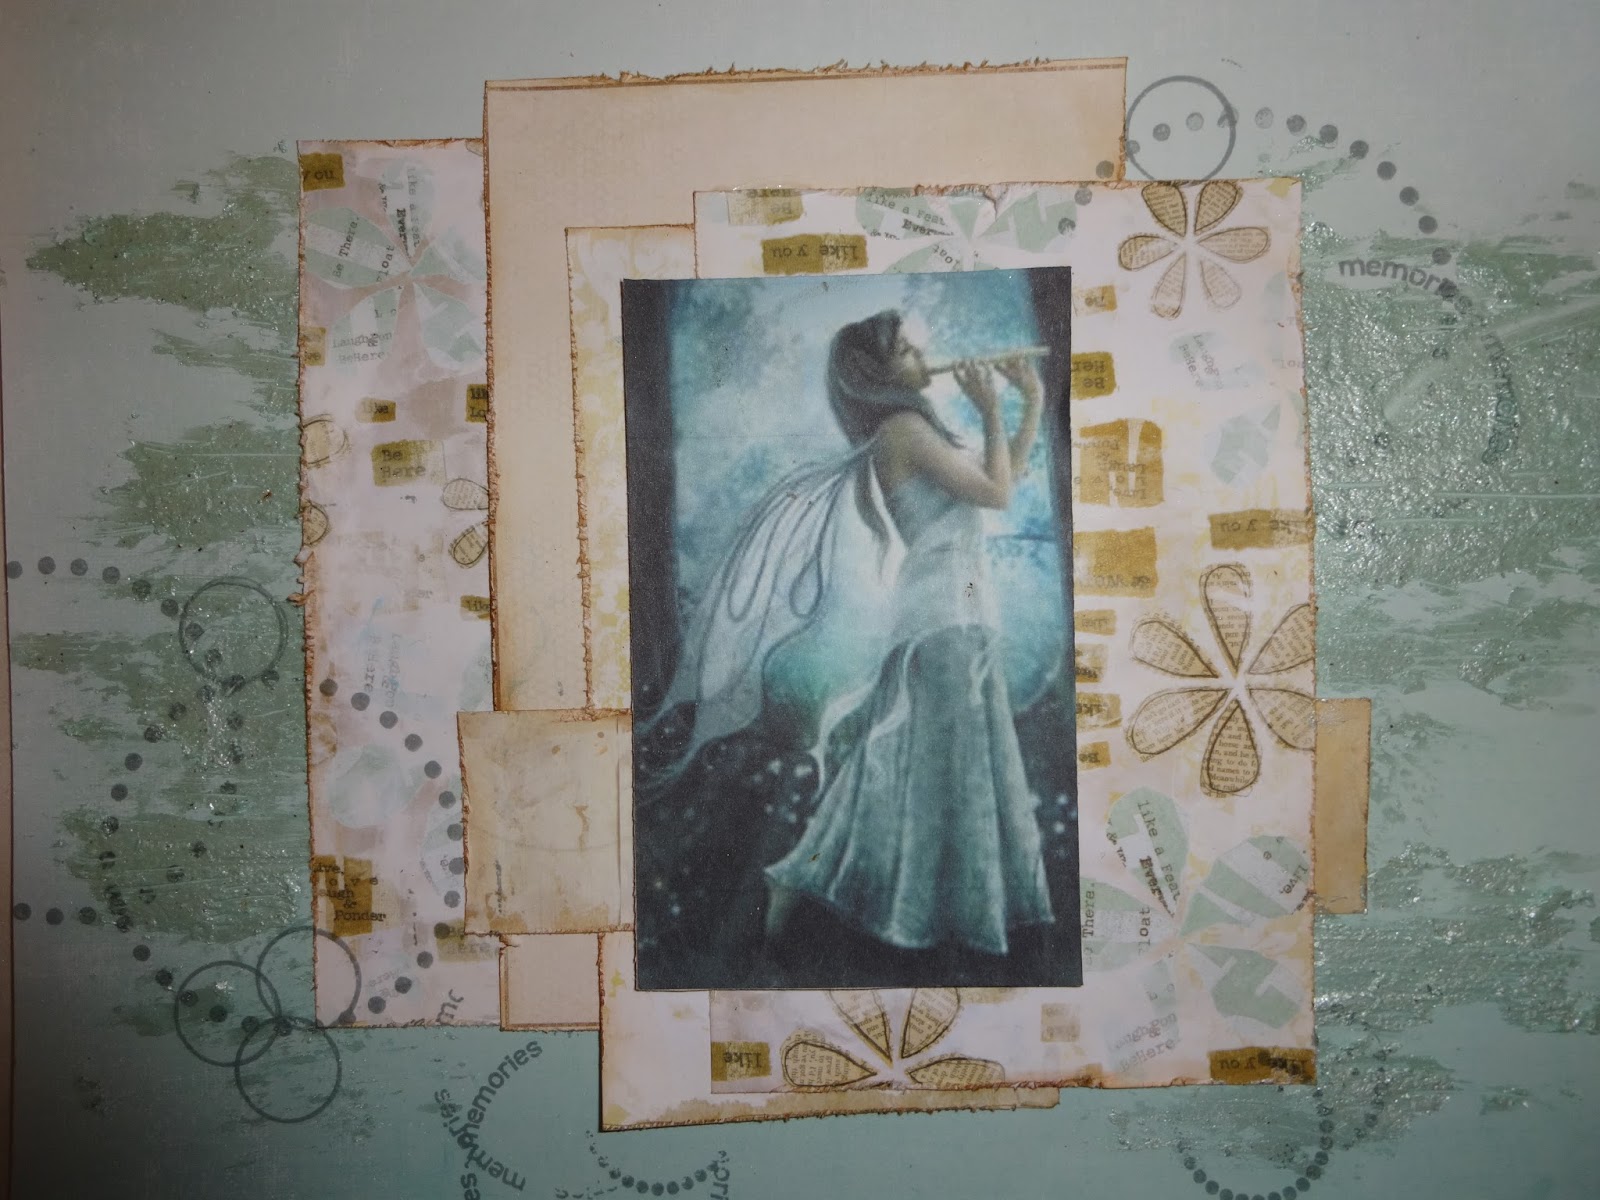
Here is a picture of the front of the album.

The album cover is made from chipboard sections that have first been covered in quilt batting 
then covered in a cotton fabric.
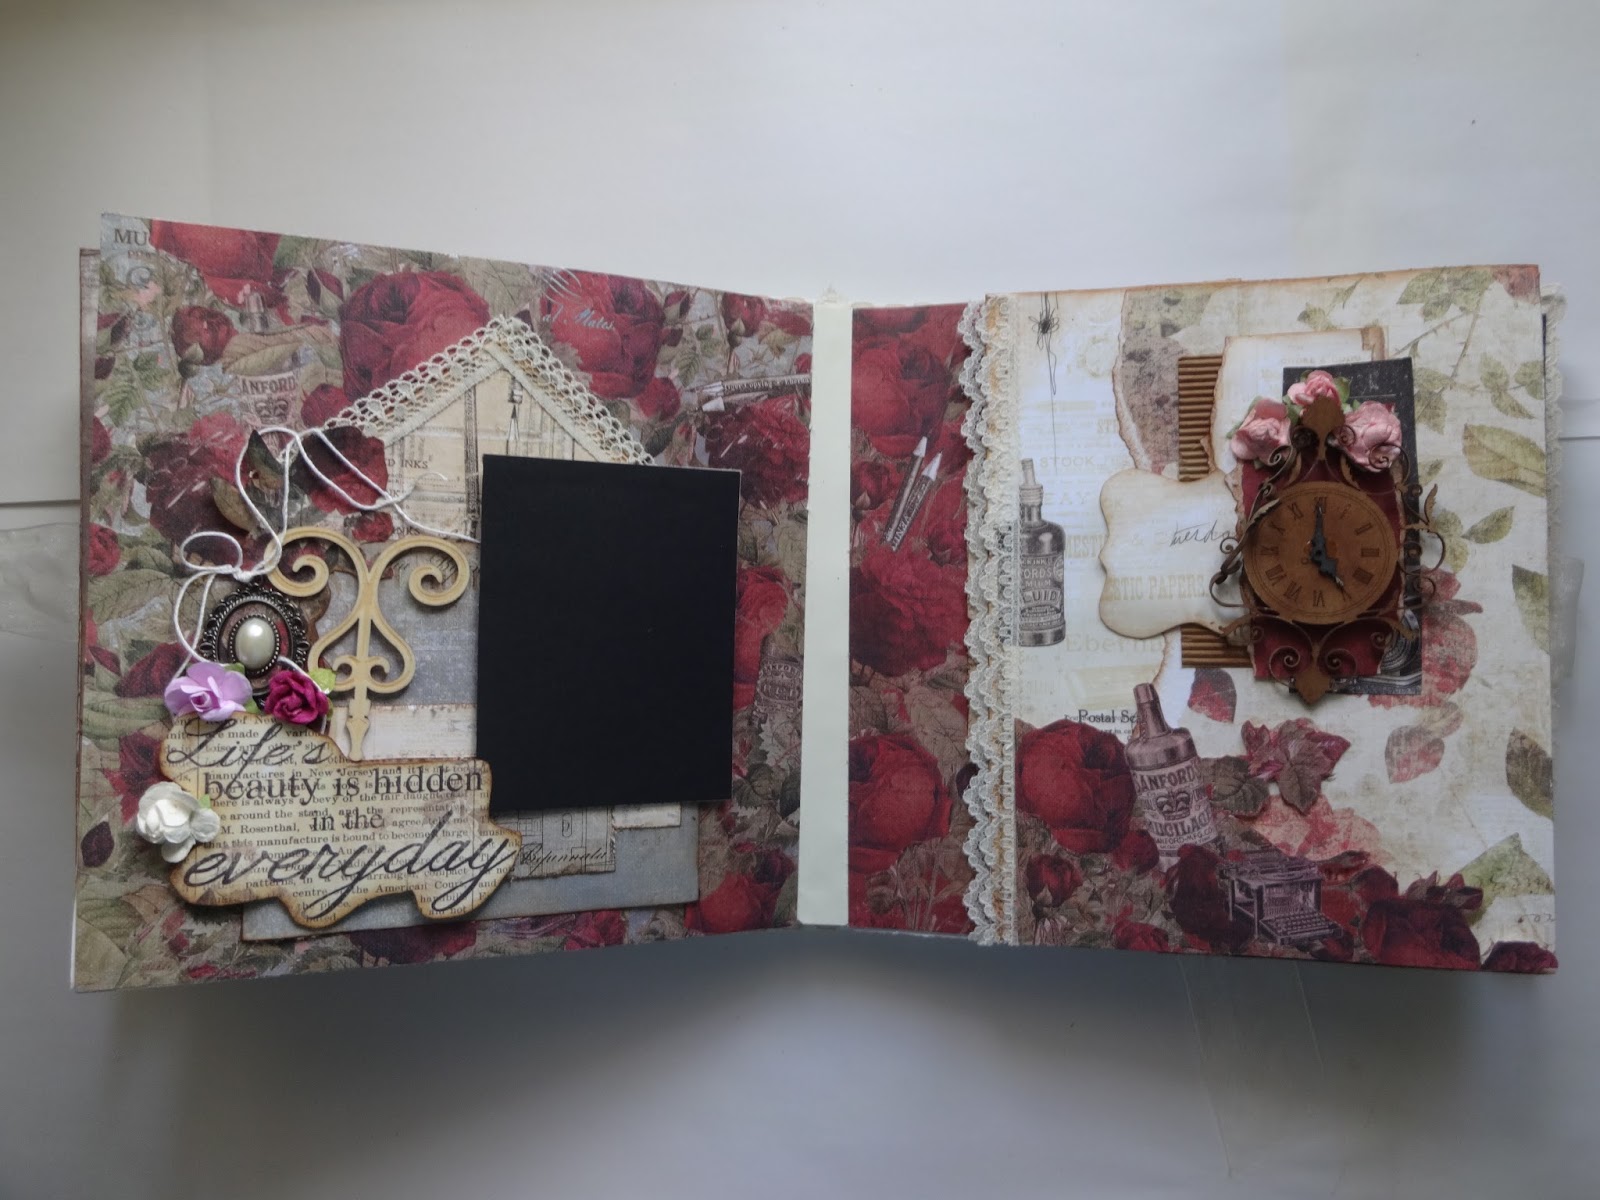
There are 4 pages inside (front and back for 8 pages) and the front and back inside covers have been prepared for the addition of more pictures.  Here is a couple of photos of a few of the inside pages.


This album kit has been posted under "Hand Made Albums" in the on-line store.  The kit includes all materials:  fabric, pre-cut papers, embellishments, ribbon, etc.  Detailed instructions are included as the entire album will be made by hand including the inside page binding.
The kit must be ordered and pre-paid - quantities are limited.  You can email the store at orders@thescrapping bug.com if you would like to order the kit.  Then proceed to the on-line store to order there.  By doing this we can start preparing the kit for you.   Please allow a few days to prepare the kit.  We also will ship to the United States which includes all products in our on-line store.  The $65.00 cost is in Canadian $ plus shipping.  Pay Pal is available.
Your comments are welcome.  
I plan on having more bi-monthly items available for ordering, including more albums with different themes and sizes, mixed media canvases, etc.

Until next time, this is Joanne (owner) and Donna wishing you and your family
"SEASON'S GREETINGS"
AND THE VERY BEST FOR THE HOLIDAY SEASON
"Our hearts grow tender with childhood memories and love of kindred,
and we are better throughout the year for having, in spirit, become a child again at Christmas time."
                                                                                                                 Laura Ingils Wilder

Tuesday, December 08, 2015

Frosty Winter Layout

Hi everyone!!!  I finally finished a winter layout that I would like to share with you.  We haven't had any snow yet so I decided to add a picture of my Christmas tree which is in the same colour palette as the layout.  Hopefully it will snow soon (I can't believe I said that) so I can replace the picture with a winter scene.  I kept the layout in my fav colours- teal and seafoam- with white accents and embellishments.

Using a stencil with tiny holes and thick white gesso, I applied the gesso in various areas of the page - across the top and then staggering it around the centre section where my picture is.  Let this dry.  I then applied Shimmerz "Tidy Widy" textured past (absolutely yummy stuff) with a spatula across the centre of the paper in a V shape and then down from the top of the page to the bottom again in a V shape.  I put it on fairly thick to give extra texture.  When this dried I sprayed using Prima Glistening Waves and Heidi Swapp Seafoam sprays.  I mainly sprayed onto the texture paste and around the centre section where the picture is.  Below is a close-up.  I did't worry about the drops of spray - I knew they would be covered up and if they did not get covered up, I would have left them.

I then took some scrap matching papers and made a collage with them to go behind the picture.  The white section is not part of the collage as well as the half circle you see - I was using the white as my picture size for the collage.

I had a circle chipboard doile in my stash.  I painted it in a light turquoise blue colour and cut it in half.  One half is as you see above and the other I placed at the left side just under the actual picture.  I also embossed a chipboard vine and added it next as shown.  I cut a piece off at the one end to put below the picture.  Below you can see a white furry accent under the flowers.  This is actually "fun fur" that you can purchase in the knitting department at most craft stores.  I also added some pearl stamens that go in the centre of flowers for extra accent.  The blue and green flowers were actually white.  I painted them using Shimmerz "Me and Blue" and "Giddy About Green" glistening paint.

 A tree house and some bling gems finishes it off nicely.  
And there you have it - a layout that you can use for Christmas or a winter scene.
Until next time, this is Donna wishing you a happy and safe day.
HAPPY SCRAPPING
"The only place housework comes before "scrapbooking" is in the dictionary."

Monday, November 23, 2015

Easy Mixed Media Glass Jar

Hello everyone!!!  Today I thought I would share with you a quick Christmas table decoration using a glass jar that I found at my local craft store.  You can use jars in many shapes and sizes - you can even use an empty pickle jar if you like.  Below is the completed item and I will share with you the simple techniques that I used to complete it.

With plain white tissue paper, I cut pieces, wrinkled them, and adhered them to the glass jar using matte medium.  The matte medium is a very good adhesive especially on shiny hard surfaces like glass.  Below you can see the tissue.  Some spots you can still see the glass, but this will get covered up.  I added some netting around the  bottom of the jar to give a different texture.  You can add whatever you want.
I then painted the whole surface with a thick coat of white gesso.  The thicker coat added to the texture of the tissue.  Let this completely dry.


Gessoed surface  below.


I then painted the complete surface with a red kraft paint.  Any paint will do.  When this was dry I sprayed with a gold spray and let the spray run into the grooves of the tissue.  After this was dried I applied some gold textured paste (Finnibair) roughly here and there over the surface of the jar.  See below.


I tied a generous bow from an antique lace that I had.  Using a hot glue gun I added my embellishements:  flowers, pine branches (not real), poinsettia branch, gold poinsettia and tucked in a few extra Christmas decorations. I tucked some of them under the lace.   Below is a closeup of the jar from the left side and the right side.  This would make a nice gift for someone.


I hope you try this.  It was quite simple to make.  I may even try this with my granddaughters.
Until next time,
"Happy Crafting"
Candles and stars and Christrmas tree lights twinkle and glow in the velvet night.

Friday, November 06, 2015

Quick and Easy Layout

Hello everyone!!!  Today I thought I would share with you a very simple layout using some scrap papers and embellishments from my stash.  I first off selected the papers, and the flowers that matched the papers and the picture.


Below is a picture of the start of the layout.  I first decided to use my Shimmerz textured paste on the background paper to give a cloud effect.  You can see it coming out from the edges of the paper collage.  When this was dry I proceeded with the paper collage.  I love the paper collages which is a good way to use up a lot of your scraps.   I first placed my picture down without adhering, then built the collage around and under the picture.  I distressed each piece and inked the edges.  Using a couple of circle stamps, I stamped as shown using a grey ink.  You could use black as well.

I then proceeded with the rest of the layout.  I die cut a heritage clock and placed it under the picture.  Along the left side I used a decorative chipboard piece which I painted with white gesso first then heat embossed it with a white embossing powder.  I added a bit of turquoise spray onto the surface of the chipboard and inked the edges with the same brown as the papers.  In the centre of the chipboard piece I adhered a resin fairy.  Next I took a piece of cheesecloth and laid it down at the bottom left corner of the paper collage.  I adhered my main turquoise flower in the centre of the cheesecloth making sure that the cheesecloth came out around the flower.  The smaller flowers were next.  At the bottom right corner I adhered a couple of strips of paper, added a resin frame, and some flowers.  A few sparkly gems were added.  And there you have it.  It only took about one half hour.  Below is a close up of the flower section.

I hope you enjoy.  
Until next time, this is Donna wishing you a safe and happy day.
"The art of life is to know how to enjoy little and endure much."
"HAPPY SCRAPPING"


Friday, October 23, 2015

Nautical Canvas

Hello everyone!!!  Today I would like to share with you an 8" x 16" nautical themed canvas.  For this project you will need the following items:  white gesso, modelling paste, spackle which is a dry wall compound, various chipboard letters, stencil, and various nautical embellishments - shells, stones, star fish, etc. 

THE COMPLETED CANVAS

I painted a coat of white gesso onto the entire surface of the canvas.  Let this dry.  I then added a couple of pieces of  mesh, some dry wall tape and tissue to give it a textured background.  I then took the Prima bamboo stencil and applied a coat of modeling paste over the entire surface.  This gives the entire surface a lot of texture.

The next step is the outside edges of the canvas.  I decided to apply an 1 1/2" wide area of light weight spackle..  The spackle is a lot less money when you are using the amount that I used.  It does take a little longer to dry depending on the thickness that you apply.  After cleaning out some of my drawers of "stuff", I found that I still have chipboard letters to use up.  So I started at the upper left corner and worked my way around the canvas using different sized chipboard letters. I made sure that I pressed them into the spackle.  I tucked in some very small letters here and there to fill in some gaps.  Below shows you the letters.


Let everything dry completely.  Drying time depends on how thick your spackle is.  I then painted a good coat of white gesso over the entire surface including the middle section.  Let this dry.  I then sprayed the surface first using the Prima tea stain, then summer sky and a bit of the iris at the end. I applied a coat of decopauge over the surface to seal everything.  I had some turquoise glass tiles sitting in a drawer and decided to place them onto the letters around the outside edges.

I then added a piece of fish net which I found at a craft store.  It actually comes up from the bottom of the centre section and up over the right side edge.  At the bottom I used some green grass to represent seawood.  Then I added the stones, shells, star fish and some more of the turquoise broken tiles along with the lighthouse,  chipboard grass and butterfly. which I painted first. Below is a picture of the embellished section.


Until next time, this is Donna wishing you a happy and safe day.
Keep smiling and
"HAPPY SCRAPPING"
"Let us be grateful to people who make us happy, 
they are the charming gardeners who make our souls blossom"

Friday, October 02, 2015

Gramma's Garden Layout

Hello everyone!!  Today I am sharing a layout with you using the Graphic 45 "Secret Garden" patterned paper.  A short picture tutorial follows.  

 I have a granddaughter that loves the colour purple and my garden.  
This paper totally fit her personality.  I first cut a strip off the background paper 3" wide and turned it over to the other side.  I laid the two together. I then cut a 2" wide strip from another paper, adhered it to the back of the main piece then onto the top of the 3" strip.  I made sure that the 3" strip lined  up with the main piece.   I then took a 12 x 12 Prima stencil that has tiny diamonds and applied modeling paste over the entire surface including the side strips.


Next I cut several pieces of paper from the various papers in the paper line and created a collage.  I made sure that I had a piece of the 3" wide strip to pull the papers together.  Here is a picture of the collage.  I turned the upper right corner of the middle piece and adhered in place.


Next I adhered a thick piece of  chipboard to the back of the picture and adhered the picture down.  This pops the picture up.  Next I painted a piece of chipboard lattice and vine with white gesso.
After I painted the vine with a green paint to match the green in the garden and kept the lattice white.


To complete the layout I added the vine and lattice as shown then my flowers along with a resin bird cage.  For a final touch I added a small piece of cheesecloth to each flower section for more texture.  Then lastly, using glass beads mixed into gel medium, I applied the beads using a spatula in and around the layout  and onto the flowers for extra texture.  A strip of lace down the side strip between the green paper and the flowered paper strip and a few sprarkly gems finishes it off.  Here is a closeup of the bottom right section.

e,
I hope you enjoy this layout as much as I enjoyed making it.   Until next time, have a great day and

"HAPPY SCRAPPING"
"Garden fairies come at dawn, bless the flowers, then they're gone."

Wednesday, September 23, 2015

Check it out!!!
More new products now in stock!!
It's so awesome when we get new products in !!!  We are so excited to see them filling our shelves!! 
We've received the newest release for fall and Christmas from Echo Park, the newest colours of Distress Ink, new layout kits and new Memorybox dies!

Follow this link to go directly to our site where all the new arrivals are listed.
September Specials!
Half price shipping on all orders $30 or more!! That's right!  Only $5 for shipping all of September.
All Clearance section items will be an additional 25% off. 

New Product arriving this week!
Simple Stories
Stamping Bella
Lawn Fawn
October arrivals...
Authentique
American Crafts
Pink Paislee
Doodlebug
Crate Paper
Stamping Bella (starts shipping Oct 5th)

Membership Discounts
We are still honouring the 10% discount for those who still had an active membership when we closed the location.  It will continue until it expires.  We have kept all of our records and will make sure everyone that is eligible will receive the discount.

Friday, September 11, 2015

8 x 8 Album

Hello everyone.  Today I would like to share with you an 8 x 8 album that I created using the Prima "Typeography" A4 paper pad.  I love this paper.  It is very pretty and very heritage looking which I love.  I won't bore you with too many details about each page and how I did the pages.  There is 8 pages plus the inside of the covers and each is loaded with embellishments.  Therefore it would take forever for me to describe everything on each page.  The entire album including the binding for the pages was done by hand.
I hope the pictures of the pages will show you the end result.
To start off with below is a picture of the front cover.  I did cover the entire cover with a pretty cotton fabric that I found at my local fabric store.  I first laid out the chipboard pieces for the cover, (two pieces 8 1/2" x 8 1/2" - one for the front cover and the other for the back cover.  1 piece for between the cover pieces).  I then adhered batting that you use for quilting onto the chipboard pieces, then adhered the fabric to the batting.  I wrapped the edges of the fabric around to the other side and secured it in place.


To start, I made the inside of the album using a heavy cardstock.   I then covered each one of these pages with my finished 8 x 8 layouts.  Each one is different.  I will give a brief explanation of some of the pages as we go.  So to start -
INSIDE FRONT COVER

FIRST PAGE
The black that you see on the pages is where the picture will go.  I first decided what size picture I wanted on each page, laid it down then built the balance of the page around this size.

SECOND PAGE AND THIRD PAGE


FOURTH AND FIFTH PAGE 
The fifth page which is on the right opens up.  There is a picture below.


You could add pictures to the inside of the flap if you wanted.  I kept the inside simple for the purpose of placing more pictures.

SIXTH AND SEVENTH PAGES
Both these pages flip open.  The sixth page opens from the top and the seventh page opens from the bottom.  A picture of this is below the main picture.


Again the seventh page was kept simple for the addition of more pictures.

PAGE 8

INSIDE BACK COVER

At the outside edges of the front and back covers I adhered a strip of silk organza ribbon, topped with a metal decorative circle.  I use this ribbon to secure the album when closed by tying a large bow.
The picture below is a view of the album when completed looking from the top so you can see how neatly the pages fit into the album.

I was very happy with how this turned out.  I hope you do too.
So for now, have a great day.  Until next time

HAPPY SCRAPPING!!!!
"Great things are not done by impulse, but by a series of small things brought together."

Wednesday, August 26, 2015

Today I would like to share with you a couple of new layouts I recently completed.  
The first one is a beach layout using some very basic mixed media techniques.  

For the background I chose a rustic wood paper that I have had for some time.  I painted a coat of clear gesso over the paper to seal it.  Some papers are very porous and when you spray or use a water-based item it can soak into the paper quickly which limits how much you can blend.
I then painted a thin watered down coat of gesso over the centre area and outwards to the outside edges.  Using a diamond patterned stencil, I stencilled moulding paste onto the outer areas around where the picture will go.  I then sprayed using Prima's  "Sunshine" mist, then lightly with Prima's "Sorbet" mist.  These two colours were the same colours you see in the towel.  When the entire surface was completely dry,  using a sponge, I  lightly dabbed white gesso around the outer areas to give more texture but making sure that I did not completely cover over the sprays.
Next I painted the chipboard frame using white gesso then I heat embossed white embossing powder over the surface.  For the chipboard lattice pieces I dabbed white gesso here and there keeping some of the natural colour showing through.  I put my picture into the frame and then I placed some pieces of scrap paper at the upper left corner and bottom right corner of the frame.  Using pop dots I adhered the frame to the layout in the centre.  I tucked a piece of the lattice chipboard at the top and the bottom of the frame.  After I added my flowers, I took some Finnibair glass beads in the "butter" colour and glued them in and around the flowers and onto the large yellow flower.
Below is a picture of the yellow flower to show you how the glass beads adds a little glitter .  I also brushed on some white gesso onto the flower petals to help blend them with the frame.

My next layout is very simple as the background paper is bold but pretty.  I first stencilled texture paste onto the background paper using the Tim Holtz  speckled stencil.  I wanted to break up some of the bold pink.  I then cut a piece of paper (6" x 8") from the Prima "Ephiphany" collection and two other pieces with the decorative black scrolls on it from the same paper.  I made a paper collage for behind my picture.  I added a die cut doilie to the upper right corner and bottom left side of the paper collage.  In my stash I had a wood doll cutout from the  Prima "Julie Nutting" collection.  I painted the clothes and hair to match my two beautiful granddaughters in the picture.   Using pop dots I added it to the layout, added some chipboard flourishes which I painted black, and a few flowers.
  
Here is close-up of the painted wood doll.  I think it is adorable and goes along with the theme of the picture.

That is it for now.  Until next time
This is Donna wishing you a great day and

"HAPPY SCRAPPING"

Friends:  "If you're alone, I'll be your shadow.  If you want to cry, I'll be your shoulder.  If you want a hug, I'll be your pillow.  If you need to be happy, I'll be your smile.  But anytime you need a friend, I'll just be me."

Thursday, July 30, 2015

Special Message

Good morning everyone.  This is an update for everyone to let you know that we are hard at work countin inventory and updating product in our on-line store.  We hope to be completed most of the updating very soon.  Our on-line store is currently still open and you can still place orders.  We know that you will be pleased with our future plans for the Scrapping Bug.  Lots of new products, lots of new layout kits, plans for all-day crops, etc. are in the coming months.  We will keep everyone up to date here on our blog.

Now I would like to share with you a project that I completed that will make a very nice gift for that special person.  At my local dollar store I found several wood gift boxes that were very inexpensive.  I purchased the one below because of its shape.


First, I painted the entire surface of the box inside and out with a cream coloured kraft paint to give it a protective seal but also so that no bare wood  will show.
I then took crackle paste from Prima and applied it all over the top of the lid and the base of the box.  Using my heat gun, I dried the crackle paste.  I then took an acrylic stamp and stamped randomly with black staz-on ink to give more texture.  I then took one of my favourite stencils and moulding paste and applied the paste just at the ends of the lid as well as around the base of the box.  Using a paint brush I very lightly brushed on some Prima Colour Bloom sprays in glistening waves and sorbet, using the sorbet first, then the glistening waves then came back very lightly with watered-down tangerine.  I used a brush rather  than direct spraying as I wanted to control how much and where I put the sprays.  Make sure that you play with your colours on a scrap piece of paper to get the combination that you want.  I only wanted a bit of contrasting colours mainly around the outer edges of the box lid  I also went over the stencilled areas.  You can add one of the colours to the rim of the lid and the base.
This next step I found to be worthwhile to give the box extra protection.  There is a product that you can get from most craft stores called Decopauge.  Some of you may be familiar with it.  It is a clear liquid that dries quickly to a gloss finish.  Simply apply it with a flat paint brush making sure that you don't go back and forth and keep your brush strokes going the same way.  This will protect the box from any finger prints or water damage and give it a nice finish.  All I had to do next was my embellishements.  Below is a picture of the top of the lid.

For some reason ,this year, I am liking the peach colours.  I find it very refreshing and colourful.   I placed a picture of a fairy into a small white resin frame and adhered it at the centre.  I used a hot glue gun for all my items for a stronger hold.  I placed the flowers around the frame along with some small tiles, a loopy bow from fine cording and some pearl drops that I found in the wedding dept. at Michaels's.  And finally around the outer edges of the lid and the lid rim, I placed dots of dimensional pearls in a peach colour.  Then I added some items to the front of the box base as you can see above.


I hope you enjoyed this latest project.  Until next time,

"HAPPY SCRAPPING"
                 from Donna
"If I'm not at the mall at least twice a week, they send me a Get Well Soon card"

Monday, July 06, 2015

9 x 12 Canvas

Today I thought I would share with you a couple of canvases.  They are 9" x 12" which is my favourite size to use.  I used some mixed media techniques on both and have included some closeups of sections of the canvases.

The background for this one, above,  was created using various sprays, stamps and stencils.  I backed the frame in the centre with pieces of paper and then added them using pop dots.   I had a quote block in my stash which I adhered to the back of the frame in the centre.  You could also add a picture.   I added some glitter at the bottom right corner and at the side of the flowers at the upper left corner.  I also inked the sides with a brown ink to define the edges.  I made the large flowers using paper doilies.  A picture tutorial is at the end of this blog on how I made them. Very easy.
A couple of closeups


For the next canvas I used the same technique with the sprays for the background.  I did place a thick coat of heavy gesso using a spatula onto the canvas first which gave it more texture.  Using moulding paste and a word stencil, I added this to the background.


I cut strips of various patterned papers, tore the ends on a slant, then layered them .  I also used some honeycomb chipboard pieces which I embossed first with white embossing powder.  After I completed the entire canvas, I added some dimensional pearls to the honeycomb chipboard.  The centre decorative piece is   embossed  with white embossing powder.  I cut out the flowers in the centre from a patterned paper and adhered it to the back of the frame.  I also layered some papers behind the frame and used pop dots to adhere to the canvas.  Added my flowers as shown making sure that they were in the same colours as the sprays that I used.
A couple of closeups


Doilie flower tutorial:  First you will need a doilie.  I used a 5" doilie for my flowers.
Fold the doilie in half and crease so that you get the centre.

Next, unfold the doilie and pinch the centre of the doilie with your fingers, which you see below.
Holding the pinched point turn it upright and carefully begin adjusting and fluffing the doilie to create ruffles and to get it how you would like.  If you want you can add some glue at the centre, but I found it was not necessary.  I then took some glimmery paint (two colours) and painted the centre of the flower.  When this was dry I added and adhered another small paper rose to the centre.  And there you have it.  I will mention when I adhered it to my project I nipped off the pinched point on the bottom first so it laid flatter.  I knew once it was adhered down the flower would not come apart.


And there you have it.  I hope you enjoyed.  Please give the doilie flower technique a try.  I bet you will find yourself making lots of them.
Until next time
"Scrapbooking is so much cheaper than a psychiatrist."