Monday, November 27, 2017

"A Christmas Scene"

Good morning everyone!!!
I hope you had an amazing weekend.  Today I am going to show you a Christmas Scene that I created using a paper mache house that I found at Michael's.  It actually was meant to be a gift box and the roof actually came off.  So I glued the roof down to secure it.
Here is the scene which does look like a gingerbread house.


To start I painted the house inside and out with a good coat of white gesso.  To start the roof I applied a very thick coat of heavy white gesso making bumps and ripples as I went.  I wanted lots of texture on the roof.  I then sprinkled a fluffy snow product and lots of sparkly glitter all over the wet gesso.  I let this dry.  I let it dry overnight because of the thickness of the gesso.  After drying, I applied a product that I had for some time which was a snow texture paste.  You could actually make your own as the paste contained a granular product, probably a fine sand.  Mix some fine sand or a granular material into white texture paste and you will have the same product.  I put the snow paste heavy around the edges of the roof and built it up and again sprinkled lots of glitter onto the paste.  I then let this dry which took about half a day.  Here is a picture below and one of the roof in the beginning process.


The completed roof.  You can see the glitter.


For the upper front of the house, under the roof, I cut and applied some grunge board that made it look like aluminum siding.  I painted this red with a metallic kraft paint.  A couple of coats did the trick.  I did this on the sides of the house and the back of the house.
For the house itself I painted the main body of the house using Art Basics (Finnibair) brown rust "rust effect paste" which has a granular feel.  Using my finger, I applied the gold "rust effect" lightly onto the rust colour.  It is difficult to see in the picture but it gives it a nice very light gold glow.  I also sprayed very lightly, and only here and there,  the Colour Bloom spray "tea stain".
For the front of the house I applied a resin door that I found at Michael's along with all the other miniature pieces. For the base I used a 12 x 18 piece of canvas board.  I covered the surface of the board with white very wrinkled tissue paper, painted the tissue with heavy white gesso (again thick but not at the front of the house where the sidewalk is), more of the snow texture paste here and there and then lots of sprinkles while still wet.  I let this dry.  When everything was dry I adhered the house down with matte medium which is an excellent adhesive (lots of it to give a good grip).  I added the fence around the entire outer edge of the canvas board. 
 To begin my scene completion,  for the sidewalk, I used coloured glass blocks that I had in my stash for some time.  I then applied kraft moss onto the base around the front and sides of the house.  And the rest is the miniature pieces that I also found at Michael's.  I made  a scene around the house with the trees first.  I added a lot of heavy gesso to the trees to look like snow.  I added tiny wreaths to the front of the house and at the sides.   I also put some lighter coloured moss along the front of the house and added some white tiny stones and miniature pine cones.  Below is a picture of the front of the house.  When everything was done, I added some more snow texture paste around the edges of the house and fence, as well as across the top of the door.


And a picture of the left side of the house.


And lastly, I added some very tiny mini lights which really made everything come together.  I put the lights around the front of the house and wrapped them around the two larger trees in the front.
Here is a picture with the lights on.


I was thrilled with the way everything turned out.  It took some time but the end result was worth it.
Until next time, this is Donna wishing you a safe and happy week.
"HAPPY SCRAPPING"
Christmas Cheer Recipe:  Combine loads of good wishes,
heartfuls of love and armfuls of hugs.  Sprinkle with laughter
and garnish with mistletoe.  Top off with presents.  Serves everyone.

Thursday, November 02, 2017

"Cherish" Layout

Good morning everyone!!!!!
I have a very simple layout for you today.  I created this using Blue Fern Studios paper, a chipboard decorative panel and a bit of background stenciling and of course some flowers and pearls.
I first stenciled some white texture paste at the upper right corner and left side edge onto the background paper.  Just enough to accent the paper collage in the centre.  For the collage I took several pieces of matching paper, cut them in different sizes and created what I call a collage.  One of the papers I cut into a strip and cut out the bottom edge to look like a banner.
I tore off a section of the background paper at the outer edges on the right side and left side.  I added a piece of white corrugated paper onto the back of the torn areas.  Added some flowers and small accents to each section.  I embossed the chipboard decorative panel with a sparkly pinkish-purple powder, added decorative pieces and flowers.  Then to finish I added a collage of flowers and decorative pieces to the bottom right side along with an embossed title.  And there you have it.  Very simple and quick.


Here is a second layout, again using Blue Fern Studios paper.
For this layout I created a paper collage for behind the picture, this time I inked the edges lightly for more accent.  I also inked the outer edges of the background paper adding a shadow effect in each corner.  I added a decorative strip with some lace to the right side of the picture.  And again chipboard vines inked with green ink and a flower collage at the left bottom corner of the picture.  Simple and pretty.


Until next time, this is Donna sending you wishes for a safe and happy week.
"HAPPY SCRAPPING"
"Be what you are.  This is the first step toward becoming better than you are."
                                               Julius Charles Hare

Monday, October 16, 2017

"Spooky Hollow" House

Good Morning!!!!!!
It is that time of year when the pumpkins, scarecrows, witches and broomsticks come out of their boxes to decorate the front yard.  I quickly put together a witches house that I am going to share with you.  The house itself is made from very strong cardboard which I found at Micheal's.  I thought it was really cute so I decided to decorate it for Halloween.
I  first painted the entire house with black gesso. I then added various Halloween items that I found in a sale bin - a witch's hat on the chimney, a couple of large green sparkly spiders, pumpkins and a weird-looking bobble tree (I think that is what it is called).  Anyway here is the completed house.


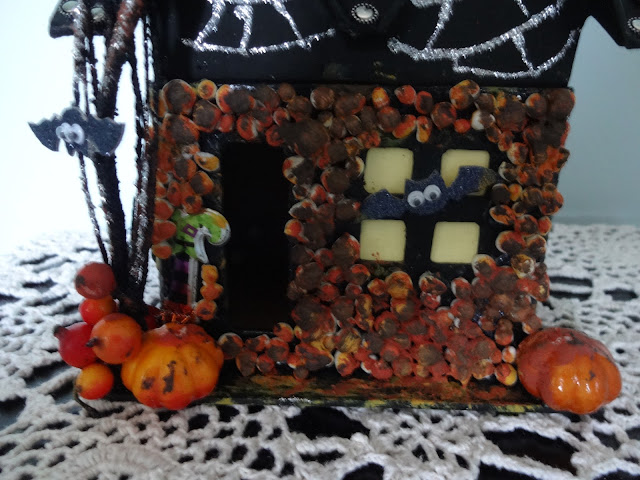
I applied large art stones (Finnibair) onto the front of the house and painted them in rust and browns.  I wanted it to look like a fungus or worts were growing on the house.  I added a bat to the window which is a sticker and  upside down sticker foot on the left side of the door. As you can see I adhered yellow cardstock to the windows on the inside.
I adhered the witches hat onto the roof just on the right side of the chimney.  Some pumpkins here and there and the bobble tree on the left side.
A couple of closeups are below.
Front of the house

 I added a sticker foot and some pumpkins to the hat for colour.


This is the left side of the house.  The spider web I drew on with silver stickles. I also put webs on the fron of the house and right side. I hope you can see the large green spider on the roof and another one at the back side of this section.


And there you have it.  Until next time,
this is Donna wishing you a safe and spooky Halloween night of fun.
HAPPY CREATING
"HAPPY HAUNTING TO YOU"

Monday, September 25, 2017

By The Sea Canvas

Good Day everyone!!!!!!
One of my most favourite places to see and to view is the ocean.  Even though I don't get to view too many oceans, pictures can inspire me.  Today's project is a canvas to bring the ocean into my home.  I have wanted to do a project like this for a while now and here it is.  I have included a short tutorial on the methods I used to achieve it and the products I used as well.


To start with, I applied heavy white gesso to the entire surface of the canvas (11" x 14") using a spatula and creating ridges as I went.  I wanted lots of texture on the background.


When the gesso was dry, I cut 3 strips of patterned paper, 3" wide by the full length and layered them across the middle of the canvas. I took some white gesso and dry brushed it onto the papers to blend them into the background.  When this was dry, I took two colours of turquoise sprays and sprayed all around and onto the papers.


After the sprays, I took a water effect stencil and applied the turquoise texture paste keeping it around the outside.  With a spatula I took some of the turquoise texture paste and swiped it here and there at the top and bottom areas of the papers.  Let this dry.   And for more texture, I took a stencil with different sized bubbles on it, and applied texture paste here and there around the outside edges.  I did go over some of the turquoise stenciled areas.


And now the fun begins.  Some time ago, I purchased a package of this fish netting at Michael's.  It actually looks like real fish net.  I took a reasonable sized piece of this and spread it out across the canvas starting closer to the left side and spreading it out to the right side.
I took my white oval resin frame and decided to do something to it as I didn't like the way it looked as it was on the canvas.  So I took some burlap string and wrapped it tightly around the frame until I had it completely covered.  I had this piece of chain, (I don't know where it came from) and wrapped this around as well.  I thought it looked like a porthole from a ship.  I also added a picture that I had from a package of Tim Holtz "Found Relative" cards.  You could use a picture of yourself or a friend or anyone else.  I adhered the frame to the canvas as shown.  Now for the rest of the items which is my favourite part.  I like to layer and tuck and layer and tuck until I have the look I want.  I start by adhering my main piece which was my star fish and from there I added the flowers and lots of shells.  I made sure the shells came out from under the flowers.  I had a small glass bottle from my stash which I added as well.  Sometimes you can find these bottles at the dollar store, but I do know that Tim Holtz has them as well.
For the final touch, I added Finnibair's "art stones" here and there (below the star fish, on the frame, above the flowers). These are the perfect accent for almost any project.  At the very end, I tucked in some greenery pieces (again in my stash) and small pieces of cheese cloth to soften the look.  I also dry brushed some of the brass patina paste from Finnibair for accent onto the stones and onto the canvas around the bottom below the star fish and the flowers.
Closeups


Products used:
Strips of patterned paper for background
Gel medium for adhering the pieces down (very strong holding)
Mega Art Stones from Finnibair
Brass Patina Paste from Finnibair
Heavy white gesso
Metallic texture paste (Heidi Swapp)
2 turquoise blue sprays
Fish net
Shells
Flowers
Resin oval frame
Twine
Glass bottle, greenery, and cheese cloth

I hope I wasn't too long-winded with my instructions.  Give it a try.  Just use your imagination and let the creative juices flow.
Until next time, this is Donna wishing you a safe and happy week of creativity and fun.
"HAPPY SCRAPPING"
"After you tell your husband where you'd like to go on your vacation he asks:
"Why? Is there a scrapbook store there?"

Wednesday, September 13, 2017

Wood Wall Plaques

Hello everyone!!!
I am back with another easy project that I did for my two younger granddaughters.  I am sorry for the long time in between postings.  I had to have surgery a few weeks ago and I am now able to get back into my craft room and start creating.
Do you ever feel that you lose some of your creative juices and you just can't get your mojo going.  Well I have been that way many, many times.  So I decided to sit down and start playing.  I had these two wood plaques for a very long time - so I decided to finish them and make a plaque that my granddaughters can hang on their bedroom door or set on their dresser.  I found the large letters at my local craft store for about 50 cents each.  They were a bit chunky but once I got them onto the plaque, they seemed to fit nicely.


I started by painting the plaques with heavy white gesso to give them a good protective finish.  I then stencilled using texture paste.  When this was dry I sprayed with 3 colours of sprays.  They both like different colours so I co-ordinated my colours to match their rooms.  Below is the turquoise one.  They like bright colours so I decided to go with the brighter colours as well.


I then painted out wooden frames which I set on top of a doilie at the left side.  Then I added my letters.  And finally I put flowers and leaves in and around the wood letter and the wood frames.  I topped off the letters with glass beads to give a little more sparkle.
Keep in touch.  I will be going like gangbusters to get more projects done.
Until the next time, this is Donna wishing you a safe and creative week.
"HAPPY SCRAPPING"
"Find the good in all you can,
and never be a quitter.
If you find a problem,
find a way to make things better."

Tuesday, August 15, 2017

8x8 Mixed Media Wood Box

Hello everyone!!!!!
Today I am going to share with you an 8x8 wood box, mixed media (of course).  This started out as an experiment on the background, so bear with me as I was just playing around at the start.  I love mixed media, especially the Finnibair inspired items.   I try to keep it as simple as possible but with a lot of texture.  I have include a list of the various products that I used.  For the paint I used the Finnibair patina effect pastes.
THE BOX

I am going to try to give you a simple description of how I did each layer.
First I turned the box over to the solid back.
I then cut chipboard into various sizes and shapes and laid them out onto the box as evenly spaced as possible.   I didn't worry if the spacing wasn't perfect.  When I was satisfied, I adhered the pieces down.  I used heavy gel medium for my adhesive but you can also use a hot glue gun.  I painted the entire surface with black gesso.  A good coat making sure that I got the spaces between.


I then applied a product called "glass beads" from Liquitex.   This is a thick gel that has a granular material in it - like very fine glass beads.  I spread this onto the chipboard shapes.


Next I took a product called "string gel" from Liquitex.  Keep in mind that I am just experimenting.  This string gel is a thick substance that you can swirl onto the background - you have to be fearless and don't worry about being perfect.  Both the glass beads and the string gel will take a little bit of time to dry and will dry clear.  It is shown still wet.


When the glass beads and the string gel were dry I began painting the background with the red/rust paste - starting at the upper left corner and working it in a circular motion for maybe 4 of the chipboard shapes.  I then went with the brown rust paste working it to overlap onto the red/rust paste.  I went back to the red/rust colour again then the brown.  I continued in this manner until I had covered the chipboard pieces.  When you have finished you can go back with either colour to add them in here and there if you feel you need more of the colours.  I then took the blue paste and dry brushed this colour here and there over the other two colours.  You can do it as heavy as you would like - I went very lightly with it.  Below you can see the various colours that I used.


I sprinkled teal "mica powder" here and there onto the surface and using a spray bottle with water I sprayed the powder and let it run down the box.  You can use a thin paint brush to get it to flow.


I then took all my metal, resin and chipboard decorative pieces and painted them with black gesso.  I accented the pieces using the pastes and I painted the gears using the brass paste.  I also accented each piece with the various colours of the paste that I used on the background.
I adhered the pieces down starting with the chipboard collage panel - a piece at the upper left and a smaller piece at the bottom right.  In the centre I adhered the large resin medalion.  I added the large metal key down the centre of the medalion.  I added the metal wings and butterfly next onto the metal key.  And lastly I adhered the gears as shown.
For the final touch, using my finger, I applied ArtO gold and bronze rub, here and there, onto the raised surface areas of the background and onto the surface of the various metal pieces at the centre.
For extra texture and accent I took some fine turquoise glass beads and adhered them around the centre pieces along with some turquoise pearls here and there.  The pearls were white but I painted them with turquoise paint.
And there you have it.  Below is a list of the various products that I used.
8 x 8 wood box
Chipboard pieces for base
Resin medalion
Large metal key
Metal wings
Metal butterfly and gears
Chipboard collage panel
Turquoise pearls
Black gesso
String Gel
Glass beads
Fine crushed turqoise glass beads
Patina effect pastes:red/rust, brass, blue, brown
Teal mica powder (Finnibair)
ArtO bronze and gold rub

I hope you enjoy this tutorial and I hope you will give it a try.
Until next time, this is Donna wishing you a safe and happy week.  If you have any questions please leave a comment and I will get back to you.
"Happy Scrapping"
"If at first you don't succeed, do it like your mother told you."

Saturday, August 05, 2017

"HUGS" Layout

Hello everyone!!!!!
Sorry for the length of time for a posting.  Unfortunately, life's challenges got in the way. So today I am going to share with you a very soft and simple layout that I did called Hugs.


For the background I dry-brushed white gesso onto the paper  from top to bottom first then across the paper over to the right hand side.  I kept the up and down brushing close to the left side and extended the gesso across the middle, stretching it over to the right side.
I then cut several strips of 1/2" wide papers that matched the background paper in different lengths.  I laid out these strips one a time, without adhering, up and down first then slid some in between from side to side. (like a basket weave)  When I was satisfied I adhered them down to the paper.
Here is a close-up.

I then dry-brushed white gesso very lightly over the strips to blend them into the background.  A little bit of very light stamping here and there for accent and I was ready for my picture.
I cut a piece of patterned paper to fit behind the picture as an accent.  I inked my title with black ink then added my embellishments to the bottom right corner of the picture.  I kept it very simple because the picture is my focal point.

And I decided to give you another layout of my granddaughter at the butterfly farm.
I love butterflies so I was happy to find this picture.
Again, very simple.  I cut the diamond paper down to 11" square, distressed and inked the edges, then adhered it to the centre of the yellow background paper.  I cut a second paper down to a 9" square, again distressing and inking the edges then adhered this to the centre of the diamond paper.
My picture is a 5 x 7 which I mounted onto a piece of chipboard and adhered to the centre.

I added various flowers, vines, a die cut circle and heart and butterflies.  A couple at the top right corner of the picture and several others in the flower area.  I tucked a piece of lace just under the bottom edge of the picture.  And there you have it.  Below is a close-up.  You can see a monarch butterfly sitting on her arm.

Until next time, this is Donna wishing you an amazing week.  I have other projects on the go and can't wait to share them with you.
HAPPY SCRAPPING!!!!!!
and remember
"When it hurts to look back, and you're scared to look ahead, you can look beside you and your best friend will be there."

Thursday, July 06, 2017

Beautiful Faces Album

Good day everyone!!!!  I am very happy that I finally completed my "Beautiful Faces" album.  Below are the remaining 3 pages.  I decided not to add quotes to the pages.  I decided that down the road I may want to use this album using personal pictures so I adhered the pictures so that they can be easily removed.  That way I can even give it as a gift to someone.  Anyway, here are the remaining pages.

For each page I did paper layering and added embellishments as shown.  I decided to keep them simple but pretty.   A couple of them I textured the background with modeling paste and a stencil.


Below is showing the inside front cover and a partial view of the album when it is partially opened.


And also today I am sharing with you a layout that I created using vine and flower stamps to create my background.  I first traced the size of my picture onto white cardstock lightly with a pencil.  I then stamped outwards from each side of the traced box.


Below is how I started.  My acrylic stamp set had several different vines and different sized flowers.  So I started at the top of the box, in the middle, and stamped a vine, then worked around that first vine.  I just kept going, fanning my images out and around the picture box.


When I was finished the stamping I did add some colour to the leaves with an ink pad and wet paint brush.  I made a paper collage for behind my picture, popped the picture up onto the layout with pop dots.  I added strips of paper coming out from both sides of the picture.  I added some very tiny flowers in and around the stamped vines along with small pearls, then added the other flowers as shown around the picture.
Below is a closeup of the stamped area at the top of the picture.


This was actually easier then I thought it would be.  Try it - great way to get creative and create your own background.  I hope you will give it a try.
Until next time, this is Donna wishing you a great day.
"HAPPY SCRAPBOOKING"
"Many people will walk in and out of your life,
but only true friends will leave footprints in your heart."

Monday, June 19, 2017

6x12 Altered Canvas

What a beautiful Monday morning - sun is shining and the rabbits are again playing tag in my back yard.  They are annoying critters but it is very laughable when you watch them chasing each other around in circles.  Anyway, just another sign that summer is here.
So today I would like to share with you a 6x12 canvas that I did (back in the winter) using scrap paper, modeling paste and a stencil as well as some embellishments.  I kept the papers in pastel colours.  Here is the canvas.


I first applied a very thick coat of modeling paste over the entire surface of the canvas.  I also applied a coat of crackle medium mainly along the top and bottom edges of the canvas. When dry I painted the canvas with white gesso - not too heavy - I didn't want to fill in the cracks.
Next I cut my paper into several different sizes, adhered them to the canvas, across the centre, and overlapping them as I went.  I just kept layering and tucking the pieces.


I have a set of the Prima wax crayons - amazing - and decided to use them as an outline around some of the paper pieces.  I used various colours - pink, yellow, green and blue.  I then took a soft paint brush, moistened it and blended the colours with water.  I kept adding the colours here and there.


I then took a stencil and applied modeling paste over the entire surface.  I only used a stencil that had very fine lines on it as I didn't want to cover the papers.


I then very lightly dry-brushed white gesso over the entire surface.  Not too heavy.

Next were the embellishments.  I painted chipboard gates with white gesso and some chipboard leaves.  I added the gates first for the base and the other items next as you can see below.


For the final touch, I adhered some soft blue glass beads around the embellishments and then across the canvas to the right side.


And there you have it.  I do hope you like this project and will give it a try.
Until next time, this is Donna wishing you happiness and plenty of sunshine.
"HAPPY SCRAPPING"
"May your pathway be full of sunshine, joy and safety, as you travel life's journey."